Create an AI agent and feed it sources
Set up an AI agent in the console, load knowledge sources into it, try a question against it, then link it to the channel you want it answering on.
An AI agent answers on the channels you link it to, drawing on the knowledge sources you load. This page creates one and puts it to work.
Goal
An agent exists, holds indexed sources, answers a test question, and is linked to the channel you chose.
Before you begin
- You need the administrator role; an agent sees the list but gets no create or delete controls.
- The deployment must already hold a model provider key in the api-engine environment. The console offers no field for one.
- Something to load: a web address, or a passage of text you paste in.
- The channel the agent will answer on has to exist — see Shared inboxes and channels.
Steps
Open Administration → AI Agents. The agent list appears with a New agent button at the top right.
Press New agent. A New AI agent card opens under the heading.
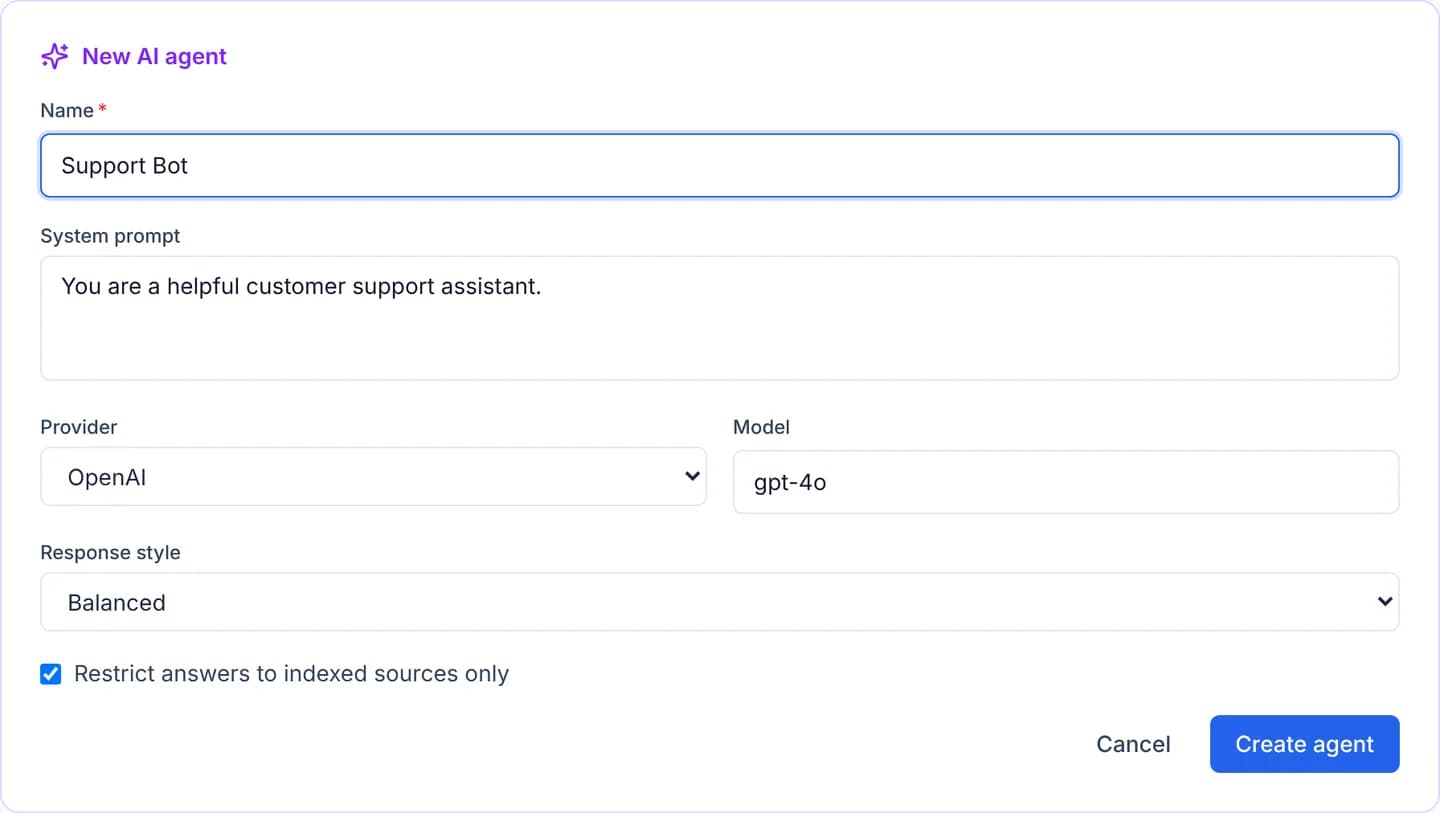
Fill in Name and System prompt. The prompt is the standing description of the role the agent carries into every answer.
Pick a Provider and check the Model box. Changing provider rewrites the model name with a default, but the box stays free text.
Pick a Response style from the three: Analytical (lowest temp), Balanced, or Creative (highest temp).
Keep or clear Restrict answers to indexed sources only. Cleared, the agent may answer beyond what its sources contain.
Press Create agent, then open the new agent with the gear button. It lands on the Sources tab.
Press Add source to open the form, set a Name, pick Plain text or URL (web scrape) as the Type, and press Add source again to save. Wait for the source to reach Indexed.
Move to Test prompt, type a question and press Run test. When the answer satisfies you, move to Channels, pick one under Add channel and press Link.
Verify
On the Sources tab the source you added carries the Indexed label rather than Pending or Failed. The Test prompt tab returns an answer with a token count and a latency beside it. Finally, send a test message from the linked channel and watch whether the agent answers in the conversation queue. The Response logs tab records every answer it gives.
Once created, an agent cannot be edited here
The console has no screen for editing an agent that already exists. The name, System prompt, Provider, Model, Response style and the source restriction are set once, at creation. To change any of them you delete the agent and build it again, losing its knowledge sources with it. An hourly answer cap and a handoff behaviour are real fields in the data, and the console offers no control that sets either.
The agent stands aside for a person
The hint on the Channels tab states it: the bot skips a conversation that already has a human assignee. Taking a conversation for yourself is therefore the reliable way to stop the agent joining in on it.
Troubleshooting
| Symptom | Cause | What to do |
|---|---|---|
| A source sits at Pending for a long time | The background worker is not running, so nothing indexes it | Check the AI Source Processing queue in Watch and retry the background job queue |
| A source turns Failed | The URL would not load, or the site refuses scrapers | Press Reindex, or paste the content as Plain text instead |
| Run test returns a provider error | A wrong API key, an exhausted quota, or a Model name that does not exist | Ask whoever runs the deployment about the key; a model name change needs a new agent |
| The agent stays silent on a linked channel | That conversation already has an assignee | Unassign it and try again, or test on a fresh conversation |
| The agent answers off topic | The source restriction checkbox was left clear | Rebuild the agent with it ticked, then load the sources again |
Next steps
Watch and retry the background job queue
Read the Background Jobs screen to see what is waiting and what has broken, open the error on a single job, and then retry it or cancel it.
Read the ticket analysis report
Open the administrator-only ticket analysis screen, choose how to group it and over which dates, then read what each of the four averages measures.