Edit the notification templates that go out
Open the notification templates screen, edit the subject and the HTML body of a template per language, and use only the variables that template receives.
Every email and every notification this system sends is built from a stored template. This page walks the Templates screen and how to edit one without breaking it.
Goal
A notification template carries the subject and the body you want a customer or a colleague to read, in the language they read in.
Before you begin
- The screen opens for an administrator only; anybody else gets Access Denied.
- Know which template does what: a name starting with
ticket.serves the ticket desk, the rest serve conversations. - Know which switch decides whether that template is sent at all — Configure notifications for the workspace.
- Have the new body ready as HTML. The editor is a plain textarea, with no rich-text controls.
Steps
Open Administration → Templates. The table lists every template that exists, one per row.
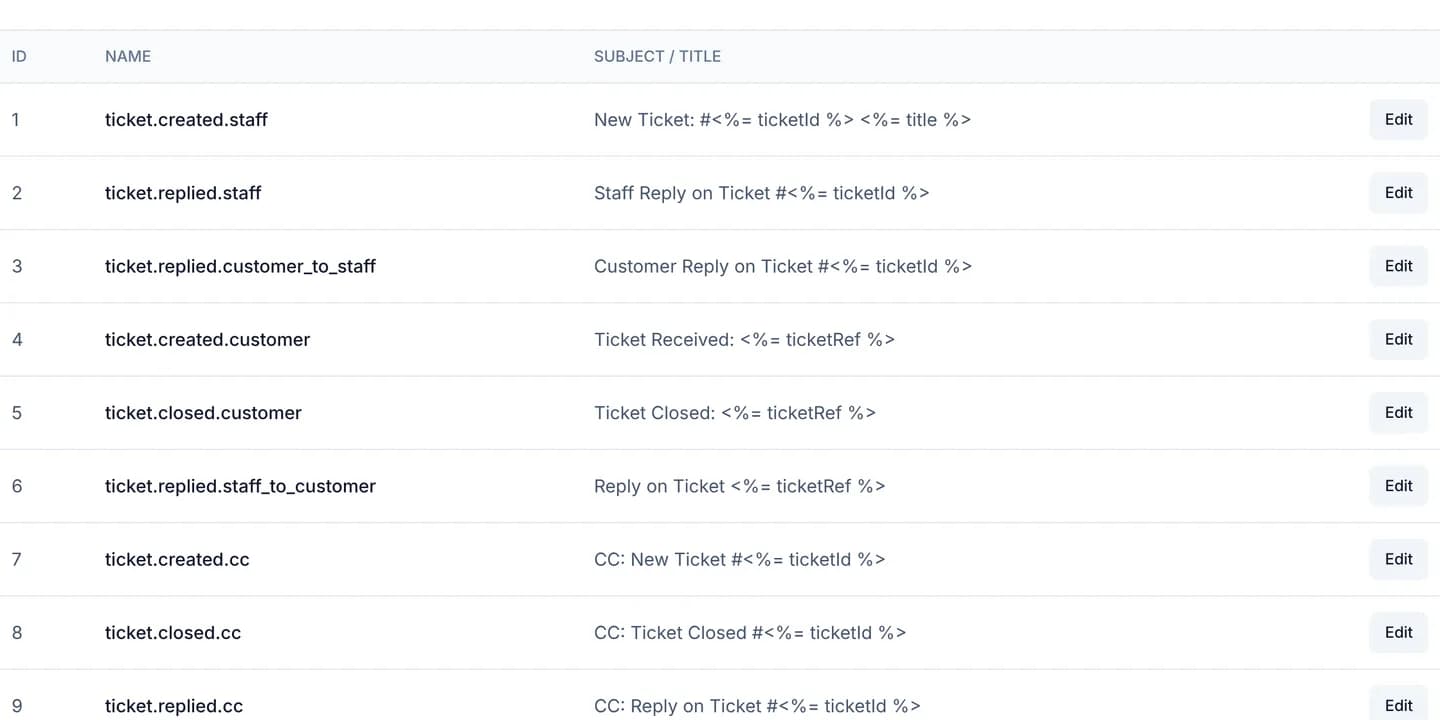
Find the template with the search box at the top right, then press Edit at the end of its row.
Look at the language tab strip at the top. Each language is a separate copy of the same template; switch tabs to edit that copy.
Edit Subject / Title. On an email template this is the subject line a customer sees in their mailbox.
Edit HTML Content. The box takes HTML with EJS tags in it, so leave the surrounding markup alone when you are only changing wording.
Read the Available Variables block at the foot and use only the names printed there. The list changes with the kind of template.
Press Save. The console confirms and leaves you on the language tab you were editing.
Repeat steps 3 to 7 on each remaining language tab. Every language copy saves on its own, and editing one leaves the other untouched.
A ticket template receives the variables below. <%= %> prints escaped text,
<%- %> prints raw HTML:
<p>Hello <%= contactName %>,</p>
<p>Ticket <%= ticketId %> — <%= title %> has a reply from <%= replierName %>.</p>
<div><%- replyContent %></div>
Verify
Go back to Administration → Templates and reopen the template: Subject
/ Title and HTML Content hold the new wording. Then cause a real event —
open a test ticket in a department whose notifications are on — and read the
mail that arrives. If the mail prints the literal <%= contactName %> instead
of a person's name, the variable name is wrong.
No create, no delete, no preview
This screen edits templates that already exist: there is no add button, no delete button, and no preview or test-send control. The only way to see the result is to trigger the real event and read the mail that lands.
Tags have no settings screen
Tags are not here and have no administration screen at all. You create one
where it is used: the tag box on the contact panel, or the tag box on a
ticket. Type the new name into Search or create tags... and press the
Create "…" row underneath it.
Troubleshooting
| Symptom | Cause | What to do |
|---|---|---|
| The screen shows Access Denied | You are signed in as an agent, not an administrator | Ask an administrator to make the edit for you |
| No language tab strip appears | That template has exactly one language copy | Not a fault; editing the open copy is enough |
| Outgoing mail still uses the old wording | You edited a language copy other than the recipient's | Open the recipient's language tab and edit that copy |
| The mail prints HTML tags instead of formatting | The variable uses <%= %>, so the content is escaped | Switch that variable to <%- %> |
| Saving works but no mail arrives | The template is fine and the sending switch is off | Check the department's notification switches |
Next steps
Create a department and add people to it
Set up a department in the console, give it a default ticket stage and a ticket id format, then add the staff who are going to work in it.
Configure notifications for the workspace
Set the name that appears on every notification a customer reads, then find where the email switches live per department and how browser push is turned on.