Grant per-feature permissions to a group
Use the Access Rights screen to create a permission group, turn read and write on per table, and then hand that group to the people who need it.
Permission in this workspace is granted to a group, never to one person at a time. This page walks the Access Rights screen and ends where a group is handed to an account.
Goal
A permission group exists with exactly the reads and writes you meant, and the people you put in it hold those rights the next time they load the console.
Before you begin
- Your account must carry the administrator role, or belong to a group badged Superuser.
- Know how the two axes differ first — Roles and per-feature permissions. This page only covers the second one.
- The list of people the group is for; see Add, edit and remove user accounts.
- Group names and table names on this screen render from the English columns of the registry, so they read the same in either console language.
Steps
Open Administration → Access Rights. The screen lands on the Groups tab with the six seeded groups in it.
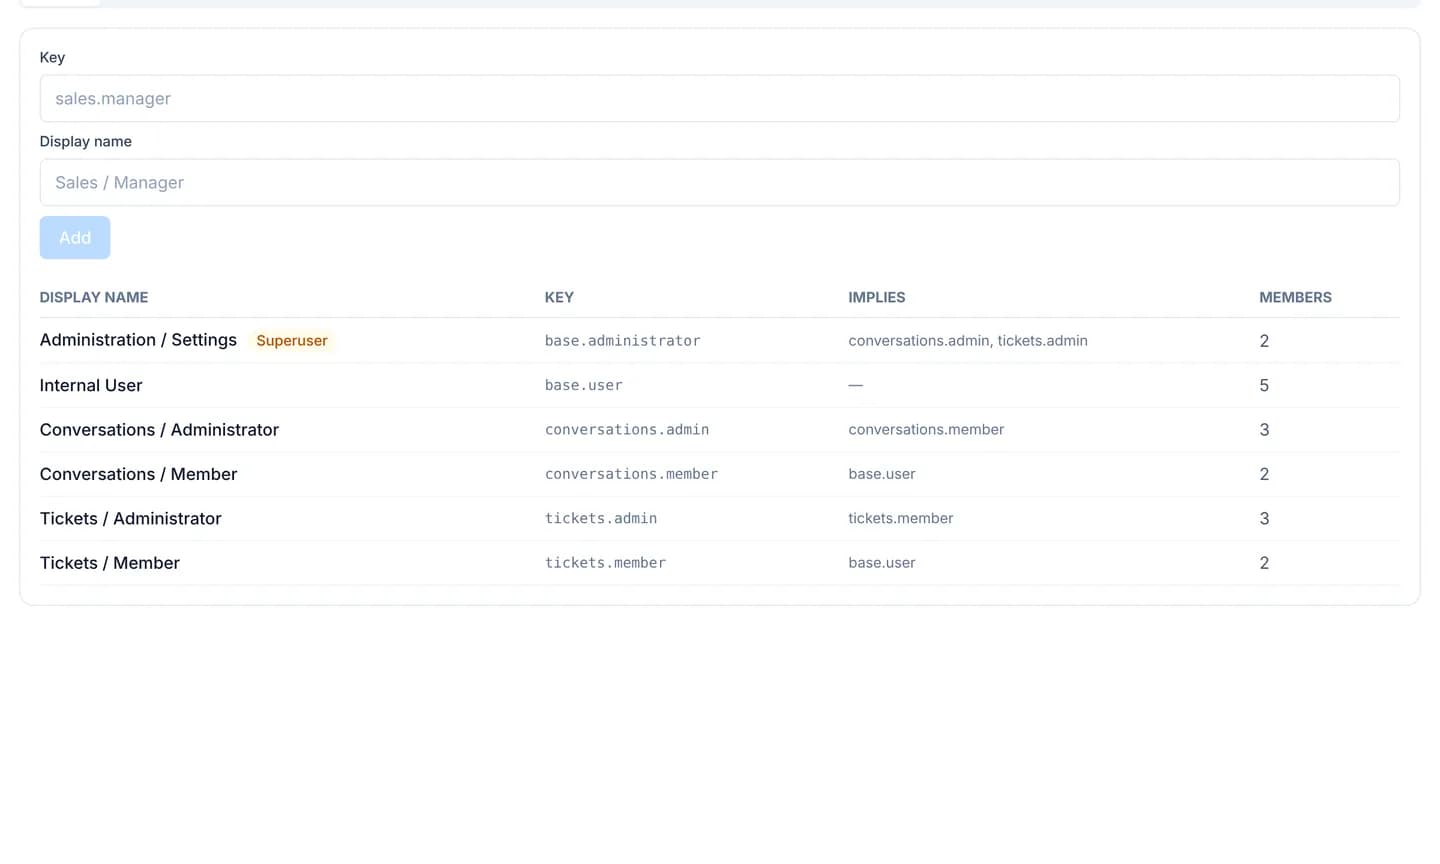
Read the Implies column: holding a group means holding everything it
implies. conversations.admin implies conversations.member, for instance.
Create a group with the Key box (shaped like sales.manager) and the
Display name box, then press Add. It arrives at the end of the table
holding nothing.
Move to the Access rights tab. Each row is a table, each column is a group, and the four small boxes in a cell are read, write, create and unlink.
Click a box to turn it on or off. Every click saves on its own — there is no save button on this tab.
Move to Record rules to narrow a group to certain rows. Press New record rule, pick the resource and the groups, then write the Domain (JSON).
Use the Fields tab to hide or freeze one column for a group. Use the Menus tab to decide who sees which navigation entry, in the Visible to column.
Hand the group over: open Administration → Users, pick an account, and tick the boxes in the Groups block. Each tick saves as you click it.
A record rule's domain is JSON, and $user.id is replaced with the id of the
caller:
{ "field": "user_id", "operator": "=", "value": "$user.id" }Verify
On the Access rights tab, the box you turned on shows a tick on a blue fill rather than a dash. On the Groups tab, the member count for the group goes up by one after you tick it on an account. The firmest check is to ask that person to reload the console: the control you granted appears for them, and the menu entry you opened is in their navigation.
Some screens still ask for the role, not the group
Granting a group write on the users table is not enough to open the
Users screen. Users, General, Templates and Background
Jobs each check the workspace role inside the console and answer Access
Denied to an agent, whatever the groups say. To let somebody onto those
screens you have to raise their Role to Administrator.
Permissions add up, and Superuser skips all of it
The hint at the top of the tab says it. In full: "Permissions add up: a member of two groups gets everything either group allows." There is no way to subtract a right another group has granted. A group badged Superuser bypasses this whole table, which is why its boxes render faded and refuse the click.
Troubleshooting
| Symptom | Cause | What to do |
|---|---|---|
| The box is on but the person is still refused | Their session is holding the permissions it loaded earlier | Ask them to reload the console; the map is fetched on page load |
| A group has no delete button | It is a system group, and the server refuses to drop it | Untick it per account instead of deleting the group |
| A table is missing from the resource list | It is unregistered, so nothing narrows it | Nothing to do; an unregistered table is reachable by every operator |
| A record rule refuses to save | The Domain (JSON) box does not parse | The console prints "The domain is not valid JSON."; fix the brackets and retry |
| A hidden menu entry is still reachable by URL | Hiding a menu is navigation, not a boundary | Turn the matching box off on Access rights; the server is the thing that refuses |
Next steps
Add, edit and remove user accounts
Create an account for a colleague on the Users screen, change the role or password of an account that already exists, and remove one when somebody leaves.
Create a department and add people to it
Set up a department in the console, give it a default ticket stage and a ticket id format, then add the staff who are going to work in it.